Our foyer has been an after-thought since we moved in because we primarily enter using our kitchen door. But recently, with
our "window to nowhere" finally closed, I've gotten the itch to create a more welcoming space to greet guests, especially after finding just the right piece to jump start the entry decorating process.
One weekend in late June, Adam and I traveled to one of my favorite thrift stores and, among other bargains, found a table that seemed like the perfect centerpiece for our empty entryway. Though dingy, beat-up and a little reminiscent of a church pulpit, I saw potential and flashed one of my signature "I'm not leaving the store without this" looks to my husband.
Most men might question my instincts, but Adam and I have been together for 7 years. He
knows better.
And at this price, we really couldn't pass it up.
The picture above also shows an aspect of the table that had to be addressed: the rough edge around the tabletop and base. Even before we reached home that day I had reached my solution: why not apply dentil trim? The trim would serve a practical purpose (to cover the rough edges) and add a extra special touch.
A quick trip to Lowe's yielded an 8' piece of dentil molding for the top of the pedestal and a plain piece of trim to wrap around the base for $14 total.
I got to work measuring and cutting the trim using my miter box and coping saw.
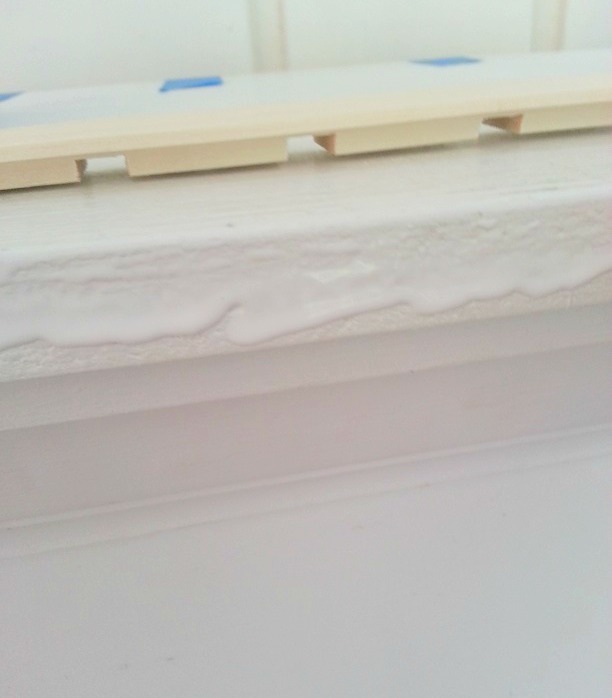
With my four trim segments cut, I applied glue to the rough edges of the tabletop. The trim was held in place with strips of painter's tape while the glue set. In case you're wondering, I used glue because I don't have a nail gun. Since the trim is decorative, it didn't necessitate anything more than glue.
I waited for the glue to fully cure before removing the tape and
applying wood filler to the seams along the top of the table and at the mitered corners. Once the wood filler fully hardened, I sanded these areas down. The seams were practically invisible.
I repeated the same process for the plain trim applied around the base's edge. After more drying time, all of the surfaces of table were sanded to prepare it for paint. I had glossy ivory paint (Benjamin Moore's "Indian Summer") remaining from
when my living room coffee table got some color, so that's what I used.
You're probably thinking, "Ashley, you took a white table and painted it white. Whoop-dee-doo." Trust me, the original finish on this table was shabbier than the before pictures let on, not to mention that the shade I chose has just enough warmth in it without straying too far into off-white territory.
I think we'll all agree that the addition of classical trim and a semi-gloss paint make for a pretty great after:
(all via Meet Me in Philadelphia)
While the rest of our foyer is nowhere near ready to be shown, this table has proved to be a great starting point for space...and all for less than $35.
You like? Would you have snapped this table up if you saw it at your local thrift store?


I think you did a great job. You took it all the way girl and it looks great! Love that mirror too. Can't wait to see more!
ReplyDeleteWhat a fantastic transformation! This is my favorite kind of DIY, one that doesn't take an eternity and uses little tools. Love it, and your styling.
ReplyDeleteI love it!!! Simple and sophisticated! Take care, Caroline
ReplyDeleteFabulous!!! Looks like way more than $35!
ReplyDeleteHow funny! I did the exact same thing with a very similar trim on my side tables in my living room! (they were like... really cheap cubby holes before). Makes such a difference!
ReplyDeleteChampagne Lifestyle on a Beer Budget
What a fun piece! Love the trim detail!
ReplyDeletesuch a great table! After 9 years with my husband I've totally prefected that "I'm not leaving without this" look too- works like a charm!
ReplyDeleteLike? I love! And that dental molding made all the difference in the world!
ReplyDeleteI love the trim you chose - and I can't believe the transformation in the wall without the window there!
ReplyDeleteAshely! LOVE!! What you did to the table really kicked it up a notch. And the styling? Total perfect with all the great texture. Just beautiful.
ReplyDeleteyou are becoming quite the diy expert! This looks great Ashley!
ReplyDeleteI love it, Ashley! I've been away from your blog for a little while and you've already accomplished so much in your house! You have a great eye for furniture makeovers!
ReplyDeleteGreat fix. And I like your basket, too.
ReplyDeleteLove! Such a statement.
ReplyDeleteGosh, the molding really makes a difference, doesn't it? Plus, I love all the natural elements you used to style it. This definitely doesn't look like a church pulpit (or whatever it was originally!) anymore!
ReplyDeleteThe Dentil trim really is a great touch!!
ReplyDelete