
Would you believe me if I told you I made this table for a whole lot less than its original price?

(Stray Dog Side Table via West Elm)
Because, well, I did.
I don't have the $300 needed to buy 2 of these tables for my guest bedroom, but I do have some ingenuity.
Ready to see how I did it?
The necessary materials (for 2 tables):
 Step #1:
 Step #2:

 Step #3:
 You now have 2 tables with their tabletops.
Are you seeing the tables taking shape?
 Step #4:
 Step #5:
 One complete table, at least complete for now:

Because, well, I did.
I don't have the $300 needed to buy 2 of these tables for my guest bedroom, but I do have some ingenuity.
Ready to see how I did it?
The necessary materials (for 2 tables):
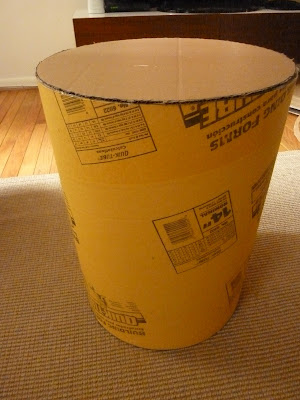
- a 4' Sonotube or cardboard Quik-Tube with 14" opening ($12.49 at Home Depot)
- handsaw or coping saw
- cardboard for the tabletop
- newspaper
- white glue
- tape measure and a marker
- paint

Measure 18" from the base of your cardboard tube in several spots around the tube. Connect these marks with a straight line. This line will guide your cutting. Begin cutting your cardboard tube with a handsaw or coping saw. Repeat these steps on the opposite end of the tube for your second table (you will be left with 12" extra).

With both pieces cut, you should have 2 tubes that are 18" tall and 14" in diameter. Now, trace the opening of your tube onto a piece of cardboard. Repeat to create 1 cardboard circle for each tube.


Cut out both cardboard circles and run glue along the edge of the tube. Place cardboard on the tube and let it set for a few minutes.

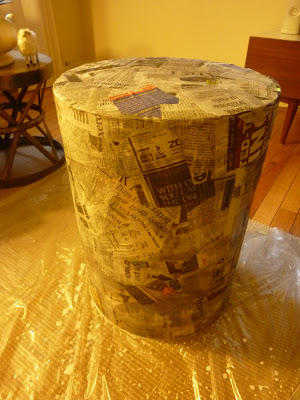
Are you seeing the tables taking shape?

Let the sticky, gluey fun begin! Take yesterday's newspaper (yes, we still get a tangible paper delivered everyday!) and start shredding small pieces. Combine 1 part white glue with 2 parts water in a bowl and drench your newspaper scraps with the glue mixture. Layer your papier mache across the top and sides of each table.

The hardest step: Wait. Seriously, stop, and let your papier mache tables dry overnight.

Step #6:
Did you wait? Are your tables sufficiently dry? Okay, let's start designing. With narrow strips of papier mache (about 5" long), create a zigzag pattern beginning from the base of the table and working towards the tabletop. If you're anal-retentive, measure your zigzags if you'd like. I eyeballed the pattern and think it turned out fine.


(you'll see my fav hometown team watching over my crafting)
And that's all for today, folks. I'm a tease, aren't I?
Be sure to check back tomorrow for the completed papier mache side tables. I promise to save you more than $275 on those two tables you have in your West Elm online shopping cart.


Whoa I think these are going to be amazing. Can't wait to see the finished product. Go Phils!
ReplyDeleteOkay I'm seriously impressed! Can't wait to see the after.
ReplyDeleteWay to go! I never did master paper mache. Would love to see thses guys in person.
ReplyDeleteAbsolutely brilliant!
ReplyDeleteBrilliant! Great diy!
ReplyDeleteNoooooo! you tease you tease!
ReplyDeleteAmazing. I can't wait to see it completed. I'm so glad you stopped by my blog today. I'm going to be following along to see more. I love your style.
ReplyDeleteBrilliant idea!!! Can't wait to see the completed project.
ReplyDeleteGENIUS!!! Can't wait to see these done. You're going to start a papier mache furniture revolution with this thing!
ReplyDelete