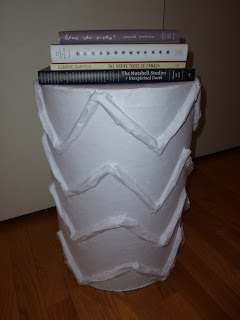
Yesterday I teased you all by sharing only the beginning of my papier mache table DIY; don't worry, I won't belabor the point, but I do want to share a few more critical steps before the "big reveal".
Step #7:
After your zigzag patterned tables have dried, begin to cover the newsprint with white paint or primer (I used Kilz Primer). A solid coat of paint will keep newspaper ink from bleeding through. Once your paint dries (about an hour), begin shredding small pieces of white copy paper--this will become the final layer of papier mache for your table. Dip all pieces of this paper into your glue/water mixture, and begin covering every inch of your table.
The copy paper becomes very pliable and easy to work with.
Step #8:
Again, the hardest part: let your tables dry overnight. If you're so inclined, I would recommend spraying your table with acrylic to protect your hard work.
Then, ta-da!
You've got yourself a papier mache table!
The only problem is: I intended to put these tables in my guest bedroom, but one of the tables looks so good in my bedroom (notice the complementary zigzag chair!)...
...while the other looks so good in my den. What's a girl to do?
I'm pretty pleased with the results. Sure, they aren't identical to the Stray Dog side table (mine have a larger zigzag pattern), but I sure saved a ton of moolah doing it my way (cue the Frank Sinatra)! I created 2 papier mache tables for all of $12.49 (all other materials I had lying around) instead of the $300 retail price of the Stray Dog side tables at West Elm.
Hope you like them!


Awesome job, Ashley!! So creative and I would have never thought to do use paper mache to recreate the look!!
ReplyDeleteLove the finished product! So perfect in those spots of your apartment, too.
ReplyDeleteGreat job! It looks awesome!
ReplyDeleteYou are one talented lady! Love how it turned out. I also like you pillow I spot on your couch. Is it block print?
ReplyDeleteDude! Wow, girl you rocked it middle school art project style! LOVE IT! I think we would have been friends in middle school.
ReplyDeleteWow. I'm picking up my jaw off the floor now. These look beautiful, Ashley! Job extremely well done!
ReplyDeleteIncredible. They look great and I love that you made it yourself. Make sure no nod sits on it. :).
ReplyDeleteHeather--the pillow on my loveseat is not a block print, actually. It's a pillow made from Katie Ridder's "Seaweed" fabric in the cobalt colorway.
ReplyDeleteGreat job girl...looks fantastic! And thanks so much for all of your lovely comments! Have a wonderful weekend!
ReplyDeleteOK, so are you taking orders? Look out West Elm! Your table really looks great Ashely!
ReplyDeleteDang, I missed this reveal.
ReplyDeleteLooks stupendous my dear. Really, so impressed you pulled this off. It adds such a nice texture to your space.
OH NO YOU DID'N.....T
ReplyDeleteamazing.
Hi Ashley, I'm visiting from Cottage and Vine. I think you are crazy...but in a good way. A very good way. And that is said with the utmost reverence and respect!
ReplyDeleteCamille
Great work. You've been featured this week at examiner.com. :)
ReplyDelete