Tuesday, April 12, 2011

Wedding Shower #3: So Very Blessed!

As promised yesterday, I'm sharing some (only some...there were a lot!) of the wonderful presents I received at the bridal shower Adam's mom and sisters hosted for me on Sunday afternoon.
Here's just a sampling of the thoughtful gifts we were given:

Coffee maker? Check!
Boos maple cutting board? Check!
Sapphire blue Staub braiser? Check!
Roasting pan? Check!
Mortar and pestle? Check!
More wine glasses? Check!
Awesome whale-shaped bottle opener? Check!
Crock pot? Check!
More Heath ceramics? Check!
Cordless iron? Check! (I'm irrationally excited about this gift...)
And I was very blessed to receive...A SEWING MACHINE! 
Now I can finally begin tackling one of my New Year's resolutions!
And, finally, my mom outdid herself yet again with one of her presents (you may remember the pillowcases she embroidered as part of my previous bridal shower gift). Mom knit a very adorable monogrammed pillow for our bedroom.
And, no, it's not 'A HA!'. These are "our" initials. What a lovely sentiment to wake up to every morning.
I feel so blessed not just with the thoughtful presents we were given, but for the love and support Adam and I have from our family and friends.

Monday, April 11, 2011

Good Ideas to Save for Later: Family Memento Board

(via Martha Stewart)

I stumbled upon this house tour on Martha Stewart that was featured in an issue from sometime during the mid-aughts, and was instantly in love its floor-to-ceiling bulletin board layered with family mementos.

This is a good idea I'll be "saving for later."

Speaking of family, this weekend was packed-to-the-brim with quality time with Mom, as well as time with my "new" family.  Adam's mom and sisters hosted a wonderful shower for me yesterday afternoon.

As a result, I'm a little behind. I'll be back tomorrow to share the generous gifts we received!

Friday, April 8, 2011

TGIF, 4/8/11 Edition

Another Friday is here again and that means another weekend filled with wedding-related celebrations (my third and final bridal shower)! 

But before I sign off for the week, I wanted to share good news from Roberta Roller Rabbit--they are holding a 20% furniture sale at their stores in Manhattan, the Hamptons, and Santa Monica.
For those of you who don't already know this, my bedroom is filled with RRR prints. If I lived near any of these stores, you know I'd be checking out the deals.

Finally, I want to say a BIG thank you for all the sweet comments about my papier mache table project yesterday. 

Every single one made me smile from ear to ear, which is important because I'll probably be removing glue from my hands and papier mache bits from under my nails for the next decade! :)

Wishing you all a great weekend!

Thursday, April 7, 2011

Papier Mache Side Table...for Less (Part 2)

Yesterday I teased you all by sharing only the beginning of my papier mache table DIY; don't worry, I won't belabor the point, but I do want to share a few more critical steps before the "big reveal".

Step #7:
After your zigzag patterned tables have dried, begin to cover the newsprint with white paint or primer (I used Kilz Primer). A solid coat of paint will keep newspaper ink from bleeding through. Once your paint dries (about an hour), begin shredding small pieces of white copy paper--this will become the final layer of papier mache for your table. Dip all pieces of this paper into your glue/water mixture, and begin covering every inch of your table.
The copy paper becomes very pliable and easy to work with.
Step #8:
Again, the hardest part: let your tables dry overnight. If you're so inclined, I would recommend spraying your table with acrylic to protect your hard work.

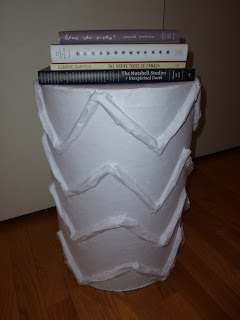
Then, ta-da! 
You've got yourself a papier mache table!
The only problem is: I intended to put these tables in my guest bedroom, but one of the tables looks so good in my bedroom (notice the complementary zigzag chair!)...
...while the other looks so good in my den. What's a girl to do?
I'm pretty pleased with the results. Sure, they aren't identical to the Stray Dog side table (mine have a larger zigzag pattern), but I sure saved a ton of moolah doing it my way (cue the Frank Sinatra)! I created 2 papier mache tables for all of $12.49 (all other materials I had lying around) instead of the $300 retail price of the Stray Dog side tables at West Elm.

Hope you like them!

Wednesday, April 6, 2011

Papier Mache Side Table...for Less (Part 1)

Would you believe me if I told you I made this table for a whole lot less than its original price?
(Stray Dog Side Table via West Elm)
Because, well, I did.

I don't have the $300 needed to buy 2 of these tables for my guest bedroom, but I do have some ingenuity.

Ready to see how I did it?
The necessary materials (for 2 tables):
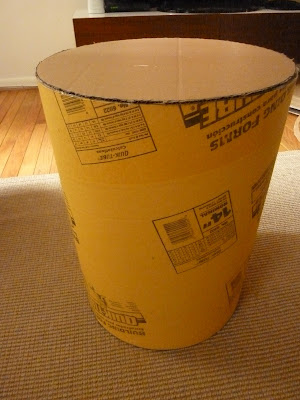
  • a 4' Sonotube or cardboard Quik-Tube with 14" opening ($12.49 at Home Depot)
  • handsaw or coping saw
  • cardboard for the tabletop
  • newspaper 
  • white glue
  • tape measure and a marker
  • paint
Step #1: 
Measure 18" from the base of your cardboard tube in several spots around the tube. Connect these marks with a straight line. This line will guide your cutting. Begin cutting your cardboard tube with a handsaw or coping saw. Repeat these steps on the opposite end of the tube for your second table (you will be left with 12" extra).
Step #2:
With both pieces cut, you should have 2 tubes that are 18" tall and 14" in diameter. Now, trace the opening of your tube onto a piece of cardboard. Repeat to create 1 cardboard circle for each tube.
Step #3:
Cut out both cardboard circles and run glue along the edge of the tube. Place cardboard on the tube and let it set for a few minutes.
You now have 2 tables with their tabletops.
Are you seeing the tables taking shape?
Step #4:
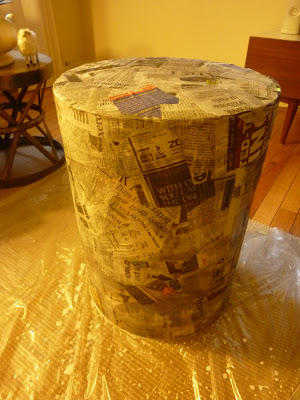
Let the sticky, gluey fun begin! Take yesterday's newspaper (yes, we still get a tangible paper delivered everyday!) and start shredding small pieces. Combine 1 part white glue with 2 parts water in a bowl and drench your newspaper scraps with the glue mixture. Layer your papier mache across the top and sides of each table. 
Step #5:
The hardest step: Wait. Seriously, stop, and let your papier mache tables dry overnight.
Step #6:
Did you wait? Are your tables sufficiently dry? Okay, let's start designing. With narrow strips of papier mache (about 5" long), create a zigzag pattern beginning from the base of the table and working towards the tabletop. If you're anal-retentive, measure your zigzags if you'd like. I eyeballed the pattern and think it turned out fine.  
One complete table, at least complete for now:
(you'll see my fav hometown team watching over my crafting)

And that's all for today, folks. I'm a tease, aren't I? 

Be sure to check back tomorrow for the completed papier mache side tables. I promise to save you more than $275 on those two tables you have in your West Elm online shopping cart.

Tuesday, April 5, 2011

Before & After: X-bench & Side Chair (And a Thank You!)

Exciting news, friends! If you love a good "before and after," I have two today that I hope you all enjoy!

I bought this well-worn side chair (from Hickory Chair) in February and knew immediately that I couldn't live long with the torn seat. Away went the ripped slub silk upholstery and in came the gray charcoal linen I'd used on my loveseat along with a shiny brass nailhead trim.
My new side chair at home in the "den":
But one "before and after" isn't good enough, so I have a second exciting revamp to share.

You may remember my sad $13 Ebay x-bench...it languished with an ugly brown floral fabric for far too long. Instead of indulging in spendy fabric, I went to Ebay and bought 2 yards of bright cobalt cotton duck for $11. 
It's important to note that both of these pieces were upholstered by Molly of Chairloom, a company I've extolled many times here on Meet Me in Philadelphia. If you're looking for a talented upholster, please check out Chairloom.

Today, I also wanted to thank Danielle of the fabulous blog Fresh Quince, who nominated me for the Stylish Blogger award yesterday. 
Thank you, Danielle! If you aren't currently reading her blog, run right over and check it out
As part of the Stylish Blogger Award requirements, I'll share 7 little known facts about myself:
  1. I pride myself being a good driver. I've never been issued a ticket or even been pulled over.
  2. I've bitten my nails since childhood (embarrassing, I know).  
  3. I've never had a sip of coffee.
  4. I set a goal this year to pay off a substantial portion of my student loans (undergraduate and graduate). I'm doing well and, on April 1, I paid off one of my loans! 4 more to go!
  5. A long-standing dream of mine is to appear on "Jeopardy."
  6. I'm obsessed true-crime shows such as "Forensic Files" and "Cold Case Files".
  7. If I could look like anyone, I'd gladly steal Catherine Deneuve's beauty.
As is customary, I want to pass along the Stylish Blogger Award to a few of my favorite sources of inspiration:
Dina of Honey & Fitz:
If you haven't checked out Dina's endless DIY work, you're really missing out! She's one talented mommy.

Heather of My Many Moments:
Heather's new-to-me blog is so beautifully styled that you'll get lost in her archives. Oh, and be prepared to be jealous of her always-amazing thrifted finds!

Bri's hilarious commentary is only matched by her endless DIY prowess. This girl's got mad skillz.

I discovered Angela's immense artistic skill via Full House and I've been in love with every project Angela's shared. Be sure to catch up!

I really like bloggers whose style is different from my own, and Court is hip, sophisticated, and way cooler that I am (perhaps I'll gain some coolness by osmosis).

Angela of Debut:
As if designing the lovely textile line Parlor wasn't sufficient, Angela has a fantastic blog that has supplied countless resources and lots of inspiration. 


Sara and her family are moving to moving to Peru very, very soon and I'm so excited to see how she incorporates her decidedly-feminine style to her new South American home!
*******
Hope you've enjoyed seeing my "Before and After" today, finding out a bit more about me, and hearing about 7 endlessly inspiring blogs that will become your new favorites.

Monday, April 4, 2011

Bachelorette Weekend

As I shared on Friday, this past weekend was spent with lovely ladies as we celebrated my last few weeks as a bachelorette! We headed "down the shore" (yes, this is how Philadelphians describe their journey to the New Jersey coast).
Adam's aunt and uncle recently completed building a beautiful vacation home in Strathmere that has gorgeous views of both the ocean and bay. Here's a glimpse of their pretty neighbor's home (right across the street):
The beautiful blue bay and sky seemed to envelope the town.
We arrived on Friday evening to an elaborate spread of food courtesy of Adam's sister Allison (who, while a dedicated med student, managed to make a mean dinner and plan my wonderful bachelorette weekend). Friends and family from both coasts (California and Maine) made a point to come...it meant so very much to me!

Needless to say, there were no strippers or excessive drinking; instead, we spent Saturday antiquing around various spots on the Jersey Shore. Near Cape May, I found a set of linens that were monogrammed with my future initials ("AMH" if you're curious).
Naturally, I couldn't pass these up, especially during my bachelorette weekend!

I also found a navy Wedgwood vase/pot that would easily complement the color scheme in my bedroom. 
I had a wonderful time, and it was so special because it seemed everything (including the food and activities) was quintessentially "Ashley". 
I loved it all! 
Happy Monday, everyone.
Related Posts Plugin for WordPress, Blogger...
 
UA-43993612-1