I've turned over a new leaf when it comes to painting vintage furniture. I'm increasingly more interested in seeing the grain and the texture of wood furniture, so I recently reworked a thrifted desk that I had, giving it new life and a new look for the living room.
About two years ago, my husband and I discovered a forlorn desk at a thrift store for $20 and, without a second thought, I revamped it with paint and put it to work as a sideboard in our former apartment. Its color added a cheery touch to the space, wouldn't you agree?
But, moving to our new digs brought the desire for a new look for the sideboard...more sophisticated, less green. The piece would now live in our living room, so the color had to go.
And with that, I gathered my supplies and got to work stripping it:
(Citristrip, paint brush, paint scraper, metal bucket, canvas drop cloth and wire brushes)
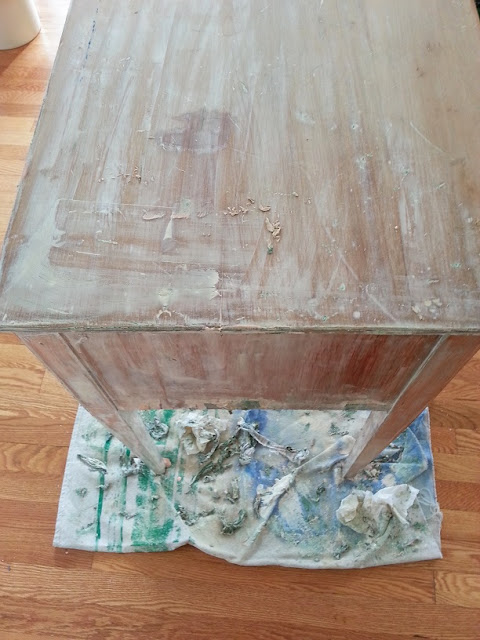
I applied a thick coat of Citristrip to the sideboard with my paintbrush and waited about two hours for the solution to work. The old paint began to bubble up and I got to work scraping. I had to resist the urge to scrap too soon because the longer the Citristrip is allowed to cure, the more paint is removed. When the majority of the goopy paint was removed from the sideboard and placed in a metal bucket, I used a wire brush to remove any remaining paint from the nooks and crannies. Slowly, something very promising was revealed: wood!
At this stage, I used my electric sander to remove any lingering traces of paint. But I may surprise you here: I didn't bother staining the sideboard-turned-desk. Instead, I opted to use liming wax to keep the wood tone subtle and soft. Janell had a great tutorial of her experience with liming wax that guided me through this process, which was pretty easy and reminded me of applying shoe polish (work the wax in circles; don't apply too much all at once).
I won't pretend that stripping and liming this desk was a quick process. It tested my patience. But, I took my time because this desk had the potential of being a piece we keep around for decades if treated right. I'm happy to breath new life into a piece of furniture that someone had loved long before we did and that someone may love long after we're done with it.
I allowed each coat of the wax to dry, and applied a few more layers of wax where needed.
Now, the desk is ready to be shown off! Here it is:
(FYI: that large "window" cut-out behind the mirror is going to be closed off soon enough!)


Gorgeous! Love your taste and fantastic thrifted finds.
ReplyDeletex
Is your bedroom right off the front door? Ours is, and people think it's weird. I'm always happy to see other examples of this layout!
ReplyDeleteAnd the desk looks awesome.
Heather--Yup, the bedroom is just off the entry. I'm actually posting all about that on Friday!
ReplyDeleteI love how your living room is coming together, Ashley! So beautiful!
ReplyDeleteThis comment has been removed by the author.
ReplyDeleteHi Ashley - I remember from the old post on this piece that you had to do some wood filling near the knobs and on the top surface. But it is completely undetectable on your finished piece, which really surprised me! Did you do anything special to those areas to make them blend in?
ReplyDeleteIt looks just beautiful! I love it's cool and all the texture the grain gives. And that mirror is so fab!!
ReplyDeleteHi Abbey, Thanks for the question! The top of the desk does have some nicks but the lime wax really added an aged look that enhanced the existing nicks. The original wood filler was all but invisible and can't be pointed out on the drawer fronts. To make them blend in, I just made sure to go over all of the surfaces with my electric sander several times 'til the surface felt smooth and flush.
ReplyDeleteHope that helps!
I never think to do anything with the actual wood finish of a piece...only either leave it as is or paint it. I'm so afraid I'll mess it up! This turned out perfectly though, and goes so well with that (insanely good) chesterfield.
ReplyDeleteGreat redo! Going to have to try that liming wax!
ReplyDelete: )
Smiles!
Sammy ~ Renew Redo
I love it!!! It is so sophisticated now.
ReplyDeleteHi, Elizabeth @ Little Black Door told me about this post. I have some of that liming wax and I can't decide if I want to put it on barn-wood. I like your desk!
ReplyDelete